Integration Script Setup for Non-Standard Mail Templates
The setup procedure covered in this section applies only to Domino servers using non-standard Mail templates or running on non-Windows platforms. The setup procedure for Domino servers using the standard Notes mail template is covered in Integration Script Setup for Standard Mail Templates.
The iNotes Web Access Mail template does not support the Domino/FaxPress Integration script, but can be used to send faxes through the Gateway. Faxes sent through the Gateway using the iNotes Web Access Mail template must be manually addressed. See Using the Gateway without the Integration Script for details.
The Domino/FaxPress Integration script must be manually installed when:
| ■ | a template other than the Standard Mail template (mail50.ntf, based on Lotus Notes 5.0) is being used. |
| ■ | the mail50.ntf mail template has been customized with non-default settings information. |
| ■ | the Domino server is running on a non-Windows platform (i.e. AS400, AIX, Linux, etc.). |
Before installing the Domino/FaxPress Integration script, be sure to thoroughly review Preparing for the Installation , especially Preparing the Domino Server Lotus Notes Environments, for setup information and requirements.
After manually installing the Domino/FaxPress Integration script according to the procedures described here, you’ll also need to install the Lotus Notes Gateway according to the steps described in Installing the Lotus Notes Gateway, and then configure the Gateway according to Configuring the Lotus Notes Gateway Lotus Notes Environmentsfor the Gateway to be operational.
Step 1: Prepare your Environment
Before you start the manual installation, you’ll need a Windows-based workstation with the Notes client, Domino Administrator client and Domino Designer installed. The Domino server must be running, and the client must be able to connect to the Domino server. Make sure you have Administrator rights on both the client workstation and the Domino server. Also be sure you’ve reviewed Preparing for the Installation, especially Preparing the Domino Server.
Step 2: Prepare a Mail Account and Group
Preparing a mail account and group requires three steps:
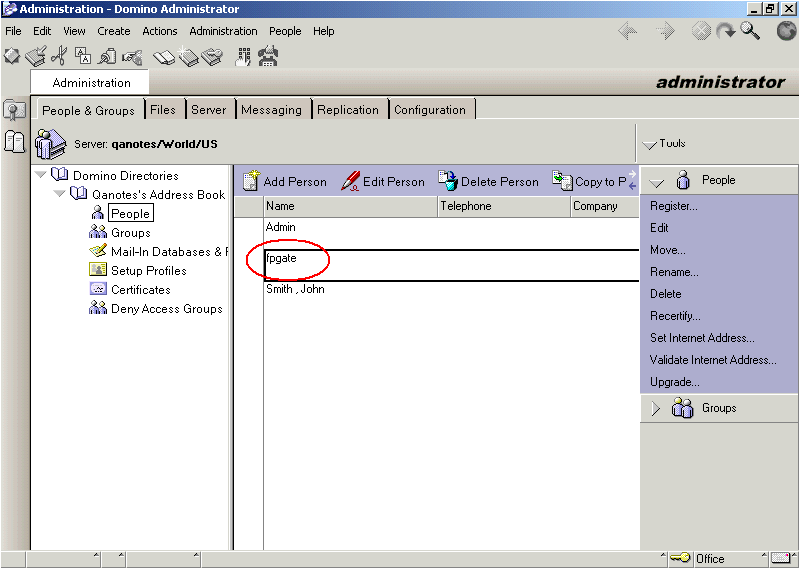
| 1. | SelectPrograms>Lotus Applications>Lotus Domino Administrator and create a dedicated mail account for the FaxPress Lotus Notes Gateway. The mail account fpgate created in this example will be used in step 8. |
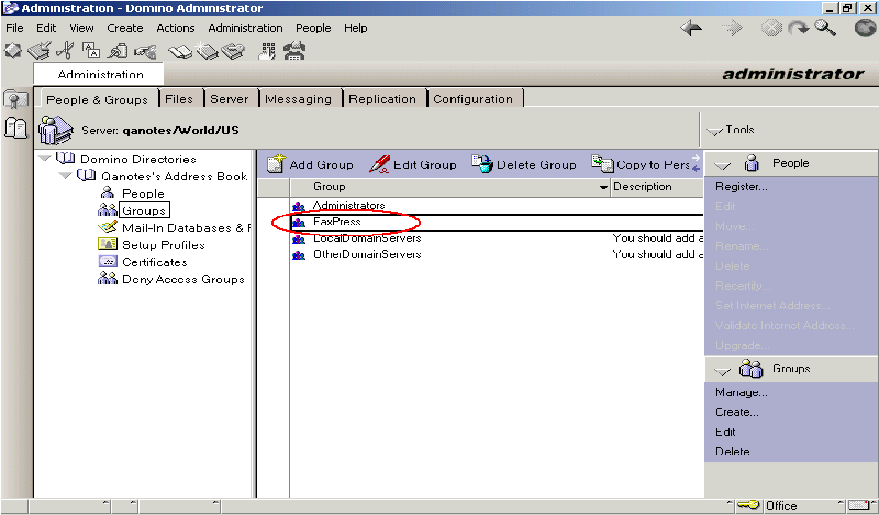
| 2. | Create a group named FaxPress. |
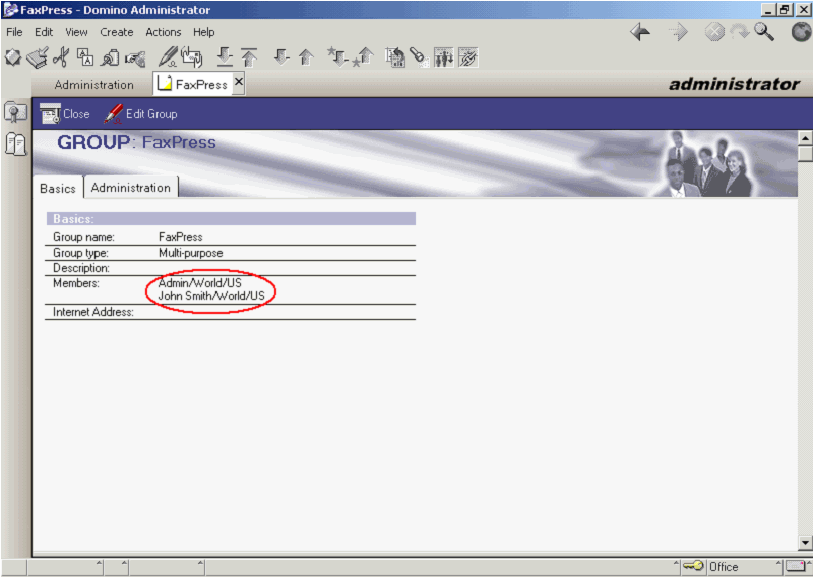
| 3. | Add all fax users into the FaxPress group. |
Step 3: Prepare the Mail Template and the FaxPress Integration Database
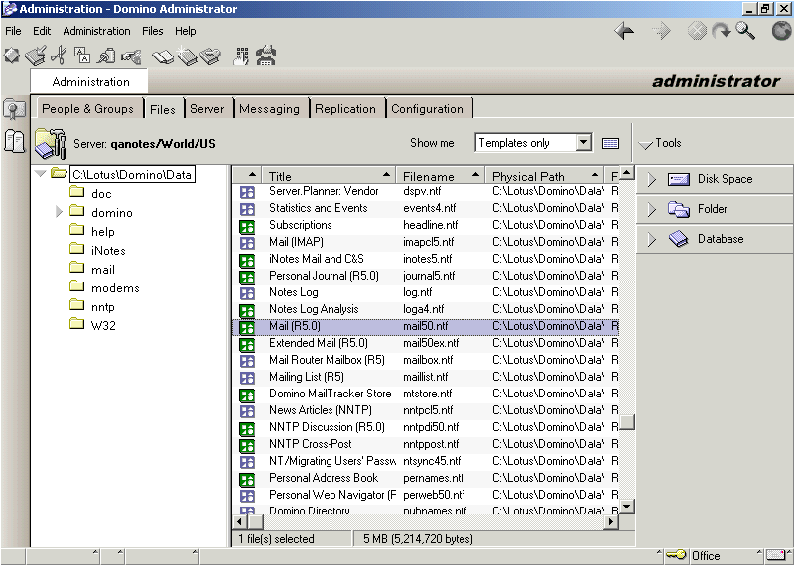
In this example, the file name of the standard Mail template in Domino R5 is mail50.ntf. The Mail template name may be different in your environment. The FaxPress Lotus Notes Integration database name used here is FaxPress.nsf.
| 1. | Back up the mail template to another directory. You’ll need this original template if you want to uninstall the FaxPress integration script. |
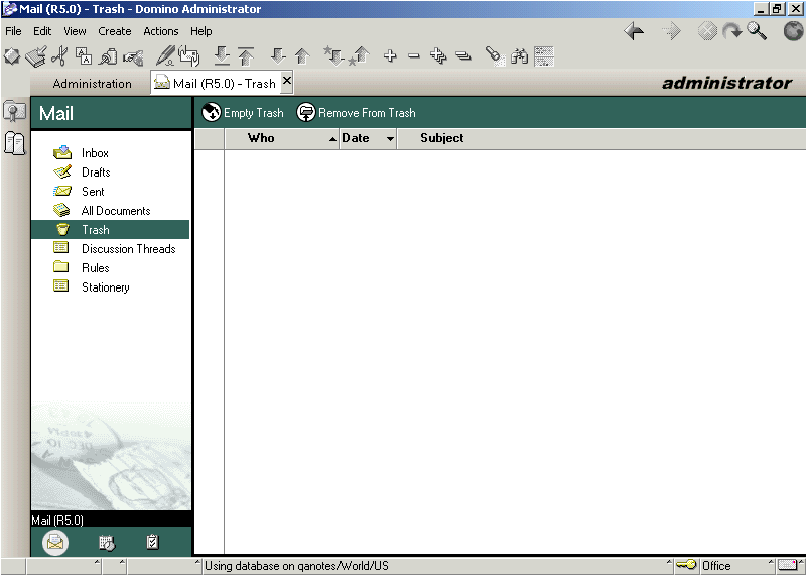
| 2. | In the Domino Administration utility, select the Files tab. Open the Mail template (mail50.ntf). |
| 3. | Select the Trash folder and close the Mail template. |
| 4. | Next, use the FaxPress CD as described in Step 1: Running the FaxPress/Domino Server Integration Script to install the FaxPress/Domino Server Integration script, FaxPress.nsf, to your local notes data directory, typically: |
<drive:>\Lotus\Notes\Data
After installing the FaxPress/Domino Server Integration script, FaxPress.nsf, continue with Step 4 below.
Step 4: Manage the Access Control List
Take the following steps to set up the Access Control List:
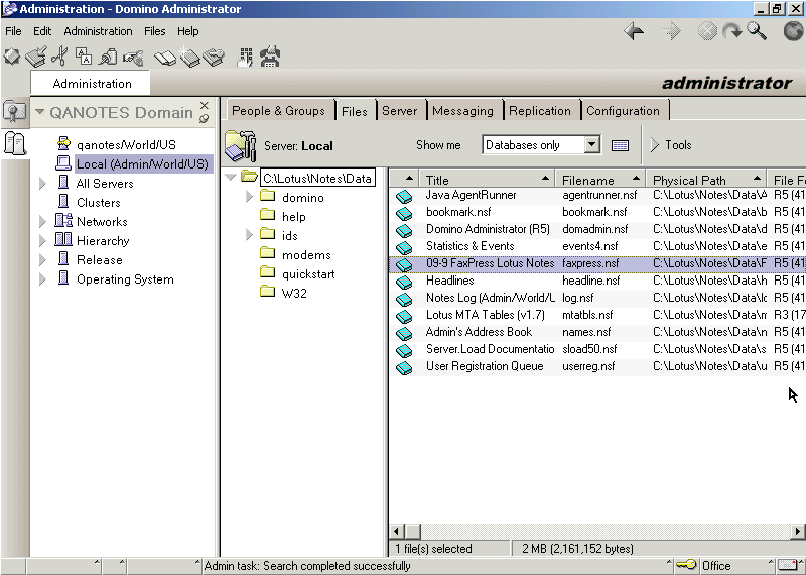
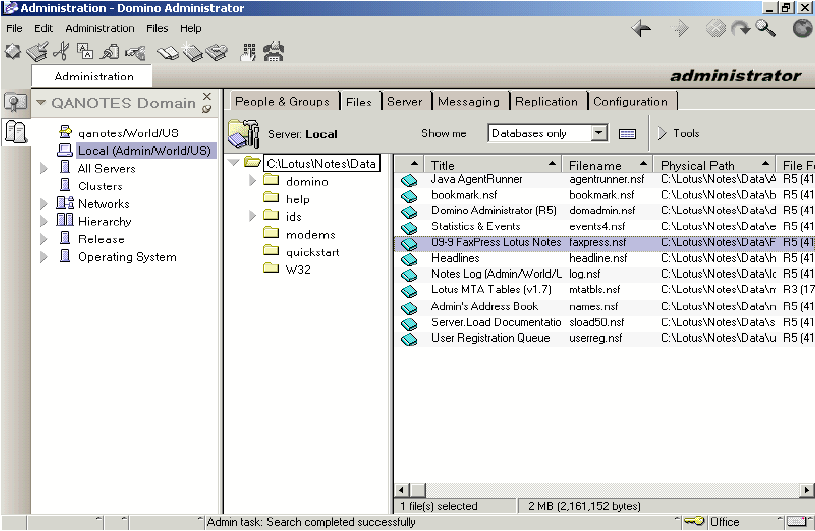
| 1. | In the Domino Administrator utility, select Local server, the Files tab, then the FaxPress.nsf file. |
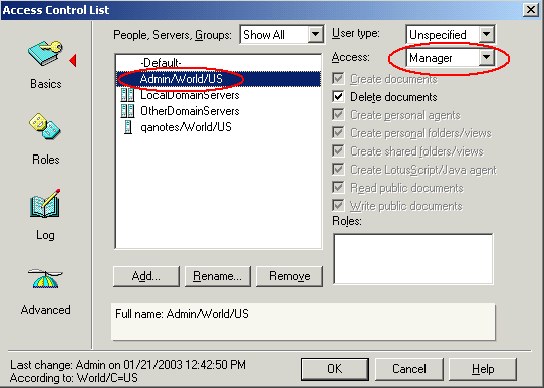
| 2. | Select Tools>Database>Manage ACL. |
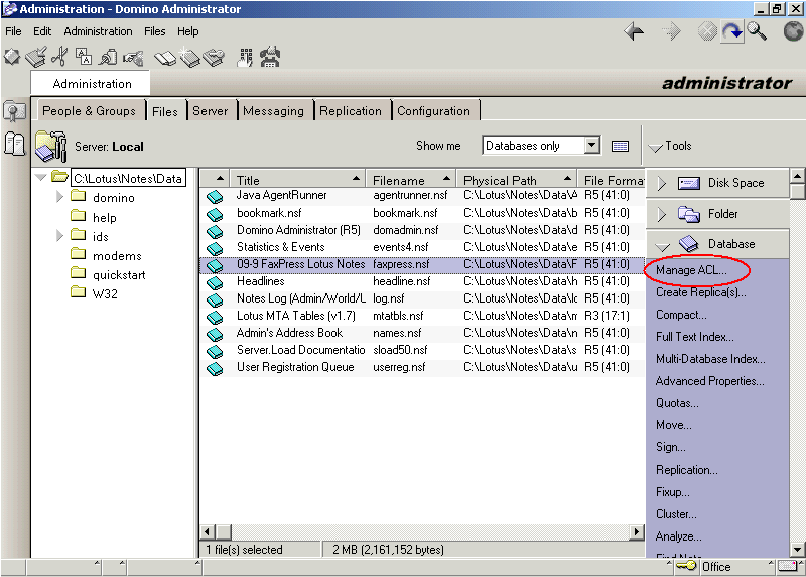
| 3. | Add the Administrator into the Access Control List and assign it Manager access rights. |
Step 5: Sign FaxPress.nsf
To sign the FaxPress file, follow these steps:
| 1. | In the Domino Administrator utility, select Local server, the Files tab, then the FaxPress.nsf file. |
| 2. | Select Tools>Database>Sign. |

| 3. | Sign FaxPress.nsf with the Administrator’s, i.e. Active User’s ID. |

Step 6: Copy FaxPress.nsf to your Domino Server Data Directory
Step 7: Update Design Elements
To update the Mail template’s design elements – Forms, Views Folders, Agents, and the Views in the Global Address Book – follow these steps:
| 1. | Open the Domino Designer and select File>Database>Open to open the Mail template. |
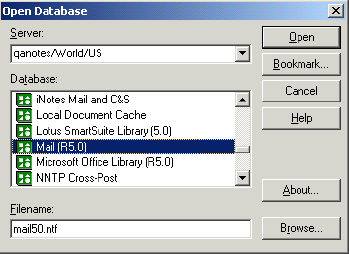
| 2. | Open Names.nsf. |
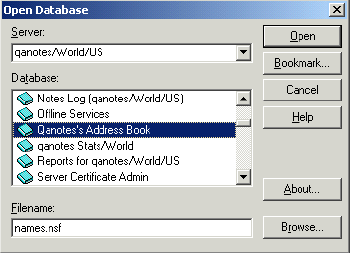
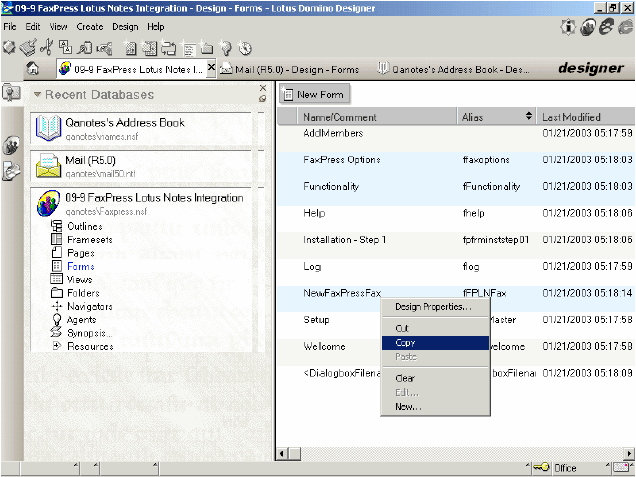
| 3. | Open FaxPress.nsf. |

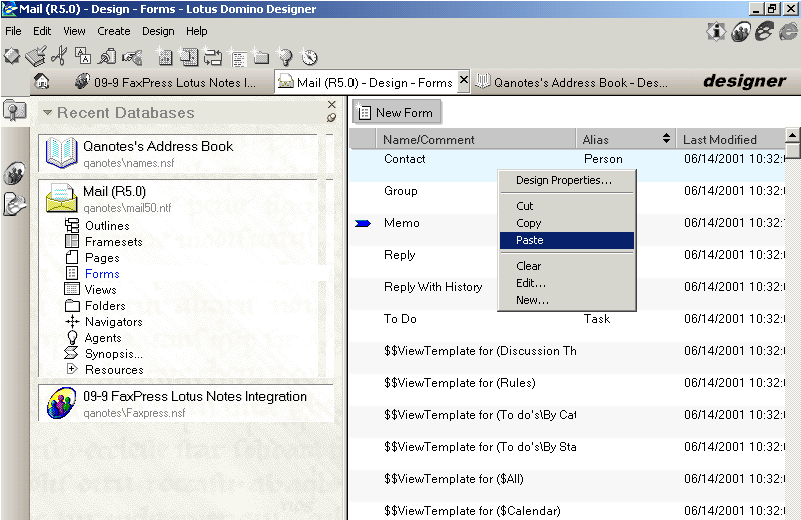
| 4. | To update the Forms in the mail template, select FaxPress Lotus Notes Integration in the left panel, and highlight Forms. In right panel multi-select FaxPress Options, Functionality and NewFaxPressFax. Right-click and select Copy. |
| 5. | In the left panel, select the Mail template and highlight Forms. In the right panel right click and select Paste to paste the above three forms into the mail template. |
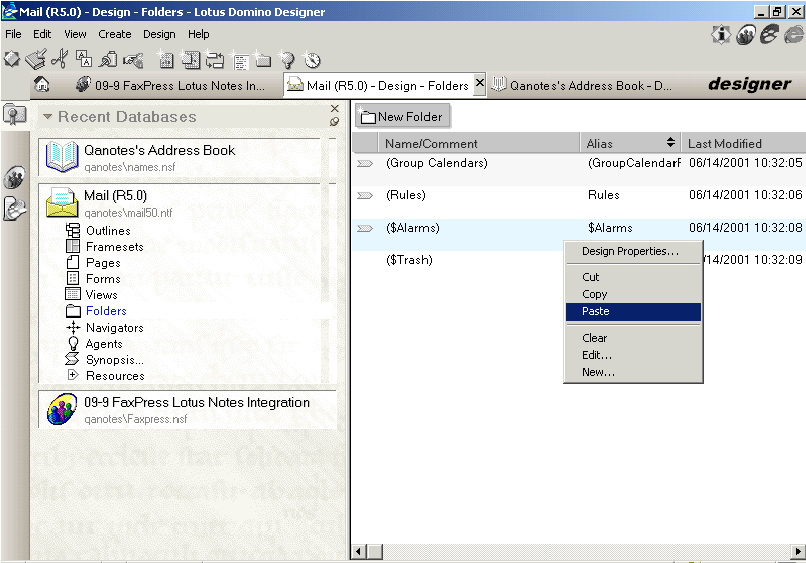
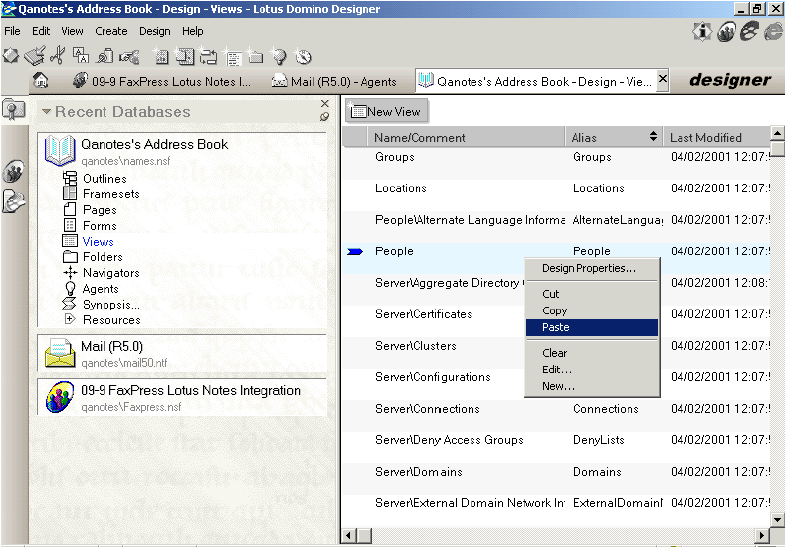
| 6. | Next, to update the mail template’s Views, in the left panel select Mail template and highlight Views. Then, in right panel select ($Sent). Right click, select Clear. Click Yes to delete. |
![]()
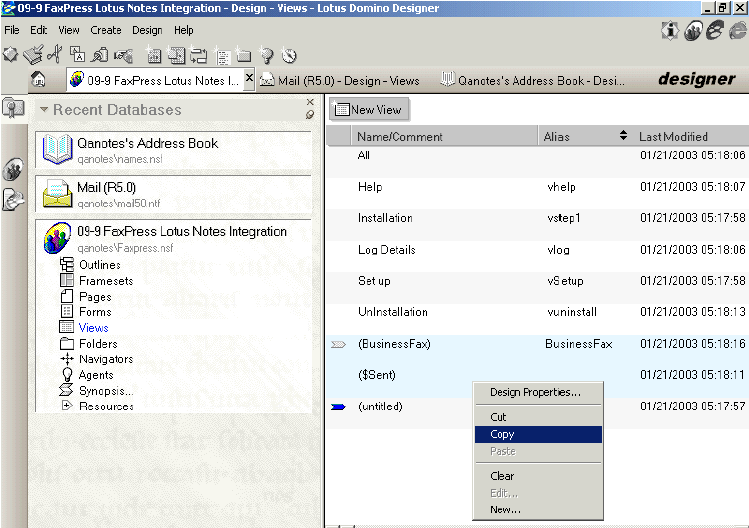
| 7. | In the left panel, select FaxPress Lotus Notes Integration and highlight Views. Then, in the right panel multi-select ($Sent) and (Business Fax). Right click and select Copy. |
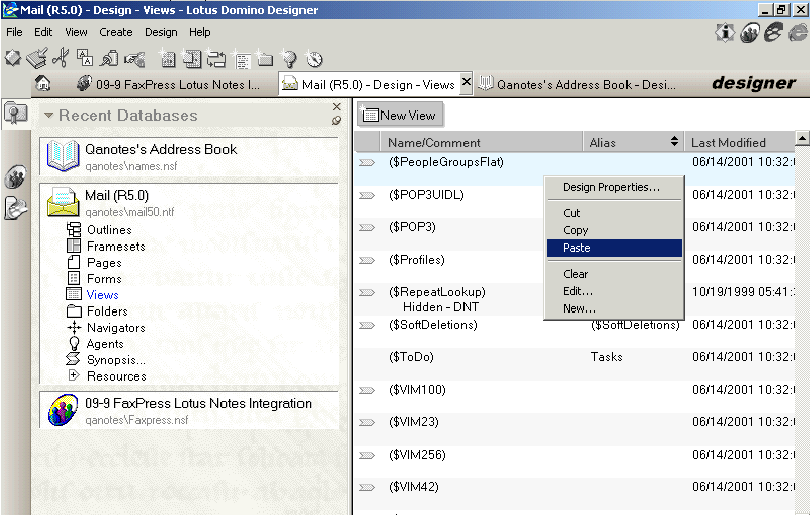
| 8. | In the left panel, select the Mail template and highlight Views. In the right panel, right-click and select Paste to paste the above 2 views into the mail template. |
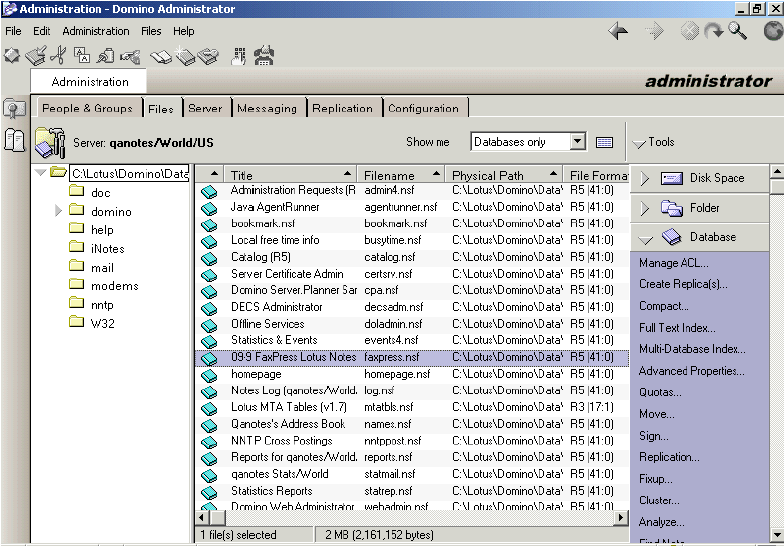
| 9. | To update the Mail template’s folders, select the Mail template in the left panel and highlight Folders. Then, in the right panel, select ($Inbox). Right-click and select Clear. Click Yes to delete it. |
![]()
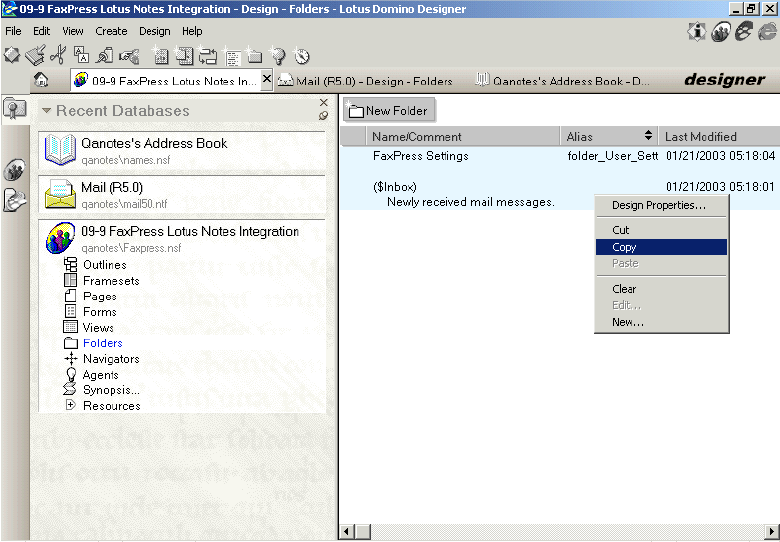
| 10. | In the left panel, select FaxPress Lotus Notes Integration and highlight Folders. Then, in the right panel, multi-select FaxPress Settings and ($Inbox). Right click and select Copy. |
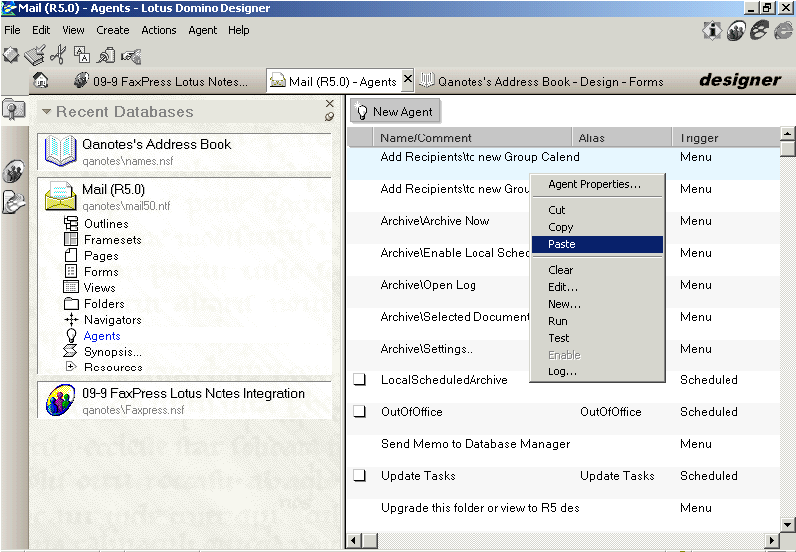
| 11. | In the left panel, select the Mail template and highlight Folders. In the right panel, right-click and select Paste to paste the above 2 folders into the mail template. |
| 12. | To update the Mail template’s Agents, select FaxPress Lotus Notes Integration in the left panel and highlight Agents. Then, in the right panel, select (CheckingFaxOption). Right-click and select Copy. |
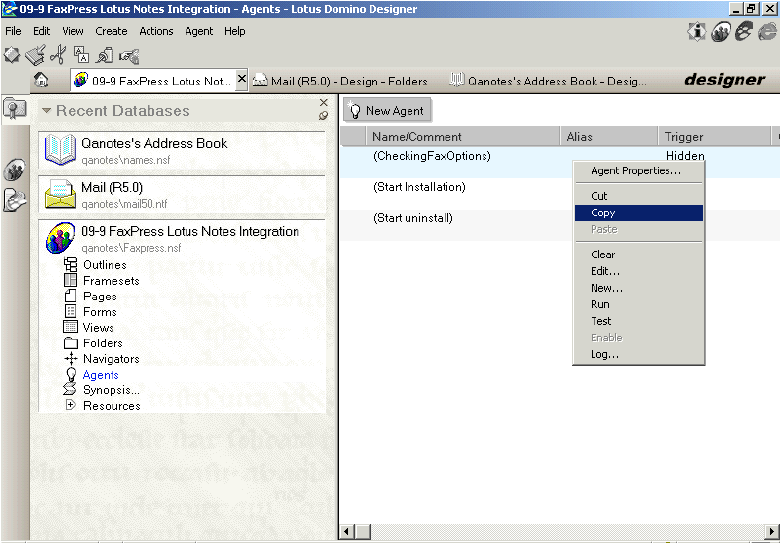
| 13. | In the left panel, select the Mail template and highlight Agents. In the right panel, right-click and select Paste to paste the above agent into the mail template. |
| 14. | To update the Views in the Global Address Book (names.nsf), select FaxPress Lotus Notes Integration in the left panel, and highlight Views. Then, in the right panel, select (Business Fax). Right-click and select Copy. |
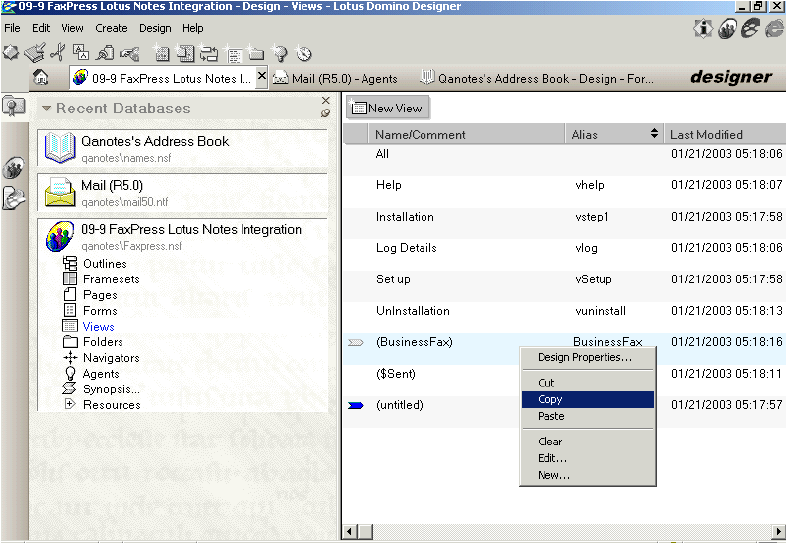
| 15. | In the left panel, select the Global Address Book and highlight Views. In right panel right click and select Paste to paste the above view into the Global Address Book. |
| 16. | Save and Close the Mail template and names.nsf. Exit the Domino Designer. |
Step 8: Setting Up the FaxPress Lotus Notes Gateway Information
To set up the FaxPress Lotus Notes Gateway information, follow these steps:
| 1. | In the Administration-Domino Administrator utility, select your Domino server. Select Files tab. Select Faxpress.nsf and double-click to open. |
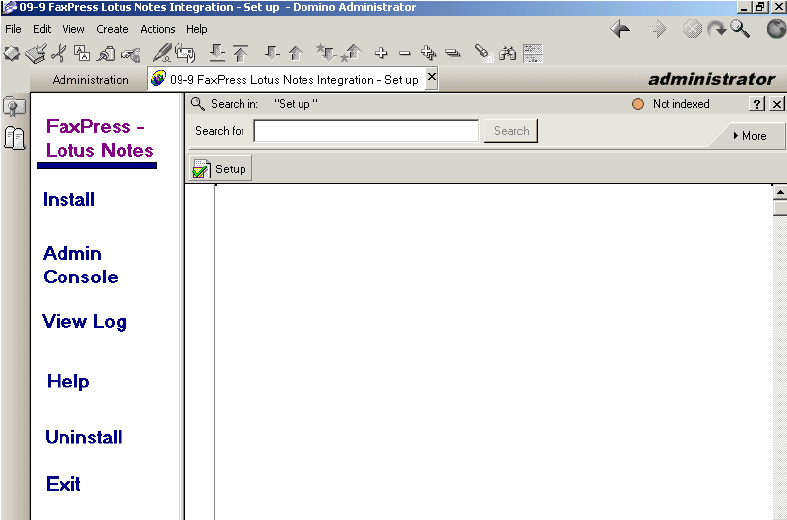
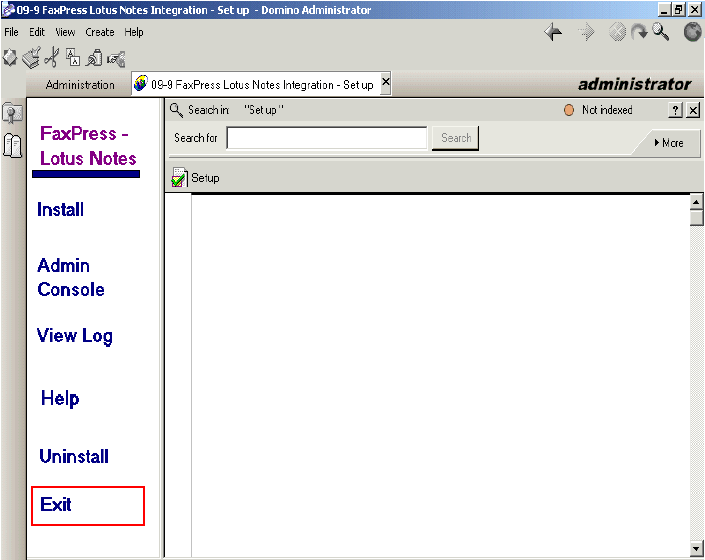
| 2. | Select the Admin Console in the left panel. Then select Setup in the right panel. |
| 3. | Enter the FaxPress-Lotus Notes Setup Information, then select Save and Exit. |
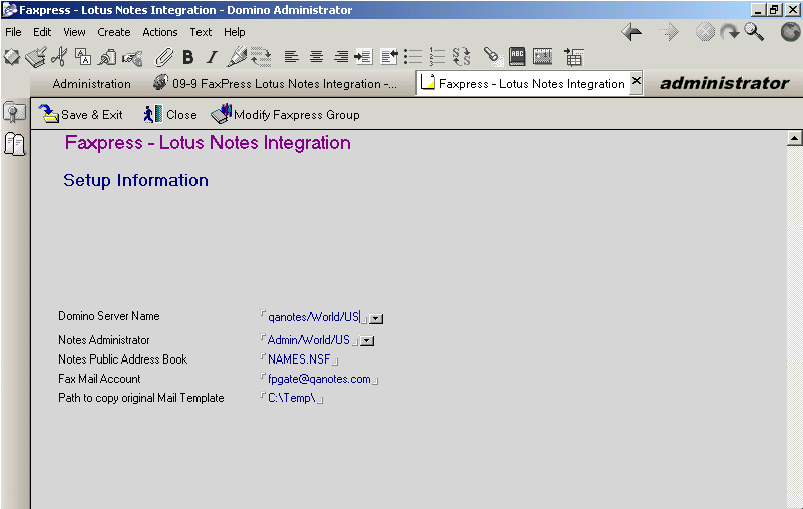
Domino Server Name – your server’s name
Notes Administrator – Administrator’s name
Notes Public Address book – names.nsf
Fax Mail Account – the dedicated mail account created in step 1.
Path to copy original Mail Template – not required.
| 4. | Click Exit in the left panel to close FaxPress.nsf. |
Step 9: Replace Design
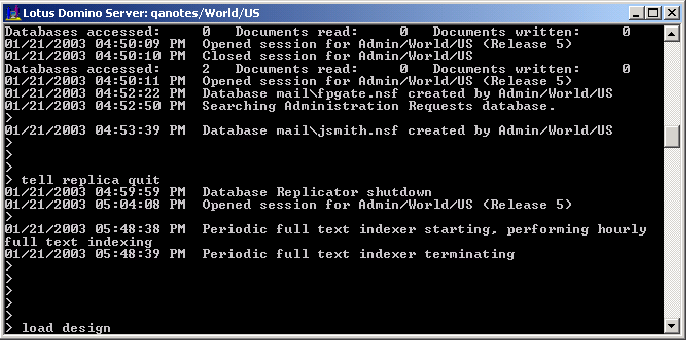
From a Domino Server Console command prompt, type > load design, then enter to apply the Mail template design changes to all the mail databases.
Next, install the Lotus Notes Gateway according to the steps described in Installing the Lotus Notes Gateway, and then configure the Gateway according to Configuring the Lotus Notes Gateway. Also refer to Using the Gateway without the Integration Script for details on the required manual addressing format.
|
FaxPress WebHelp
Last Updated: 9/12/2007
E-mail this page |
Castelle 855 Jarvis Drive, Suite 100 Morgan Hill, CA 95037 Toll-free 800.289.7555 Tel 408.852.8000 Fax 408.852.8100 |